
Run Website on AWS EC2

You may need to learn how to run your website without any help from others. Here is a way to do this.

What you need.
  • AWS Account ( you can register for Free Tier account)
Initial Plan

Firstly, I will create an AWS S3 Bucket for uploading the web content. In order to copy the content of the S3 to EC2, I need to create IAM role with s3 full access permission. Then  I will launch an AWS EC2 instance and configure the EC2 instance to run my website.

This is very simple. Let's Start.

Steps 1: Create S3 bucket

Go to services and select the S3


Create a bucket


Now click the create button


I have downloaded the basic HTML template website for this blog. you can simply upload your web content to the S3 bucket. Here I have a zip file.

click the newly created bucket and select the web content to upload


Click the upload button


Ok, now we have our web content on the S3 bucket. Let's create an IAM role with s3 full access permission.

Step 2: Create IAM Role

Now go to Security, Identity & Compliance under service and select IAM


Click the create role button


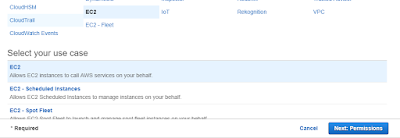
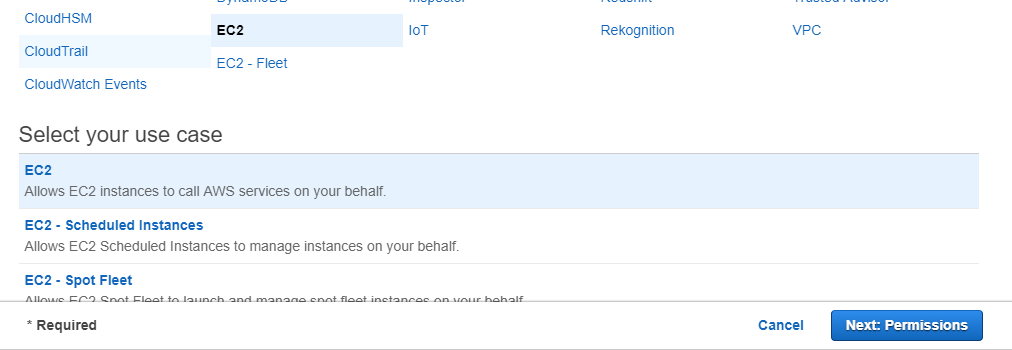
Select EC2 and click on Next:Permission


select the AmazonS3FullAccess


Click the Next:Tag 


Then Review and create the role


You have created the role. 


Step 3: Create EC2 Instance

Now we need to launch the EC2 instance. Go to Compute under Services and select EC2.


keep step 3 Configure Instance Detail and Step 4 : Add Storage Step 5: Add Tags as default


Click Review and Launch and then click launch. 


Select "create a new key pair" from the drop-down menu and name your key and hit the download key pairs and Launch the Instances. Now go to EC2 and select the instance you just create.

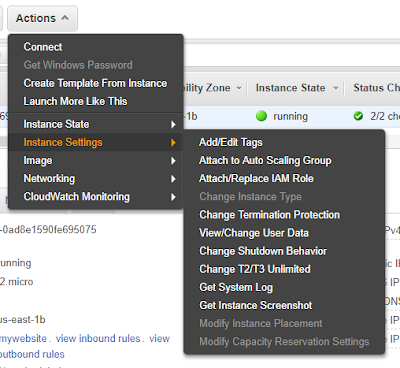
Select the Attach/Replace IAM role under Action


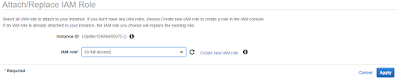
Select the Role that You Created earlier and apply.


copy the IP address and ssh to the EC2 instance using the below command in linux.


ssh -i ~/.ssh/mykey.pem ec2-user@ec2-18-232-95-17.compute-1.amazonaws.com


Now you need to install a server in order to run my website. So I have to install the relevant server using below commands

sudo su
yum install httpd -y
Now I need to download the zip file from my s3 bucket.

aws s3 cp s3://harshana-website-demo/myWeb.zip /var/www/html
Unzip the zip file 
unzip myWeb.zip
Now, I need to start the httpd server 
service httpd start
Ok, we are done.

Open the browser and go to this link  http://<ip address>/myWeb/


Comments

Popular posts from this blog

How to use WSO2 Class Mediator in WSO2 ESB

The  Class Mediator  creates an instance of a custom-specified class and sets it as a mediator. If any properties are specified, the corresponding setter methods are invoked once on the class during initialization. Use the Class mediator for user-specific, custom developments only when there is no built-in mediator that already provides the required functionality.  The syntax of Class Mediator in ESB < class   name= "class-name" >     <property name= "string"   value= "literal" >     </property> </ class > Creating a Class Mediator lets use the Eclipse  WSO2 Developer Studio Create a New  Mediator project by selecting File --> New --> project --> Mediator Project Now you have class mediator by extending the AbstractMediator class. Then you need to implement the mediate methods Sample class mediator implementation is as follows. package lk.harshana; import org.apache.synapse.Mess

One to Many Mapping using Spring boot

In this blog, I will explain how to use one-to-many mapping in Spring boot Application What you need? JAVA MySql Eclipse IDE ( whatever you like IDE, I'm using Eclipse for this example) Maven ( you can use the Gradle as well) Initial Plan I will create a spring boot application project using the  Spring Initializer  web tool and import the project as a maven project. after configuring the all necessary setting, I will code for one-to-many mapping. Below diagram is the database model diagram which we going to install using the spring boot application. Let's Start to Code. You need to configure the application.properties file for database connections. add the following content to the src/main/resources/application.properties spring.datasource.url=jdbc:mysql://localhost:3306/learning spring.datasource.username=root spring.datasource.password=root spring.jpa.properties.hibernate.dialect = org.hibernate.dialect.MySQL5InnoDBDialect spring.jpa.hibernate

When To Use Indexes In MySQL

When deciding when and how to create an index in your MySQL database, it's important to consider how the data is being used. Let's say you have a database of  students . We will create it like this: CREATE TABLE `students` ( `id` int ( 11 ) NOT NULL AUTO_INCREMENT , `first_name` varchar ( 255 ) DEFAULT NULL , `last_name` varchar ( 255 ) DEFAULT NULL , `class` varchar ( 255 ) DEFAULT NULL , PRIMARY KEY ( `id` ) ) ENGINE = InnoDB Indexes are best used on columns that are frequently used in where clauses, and in any kind of sorting, such as "order by". You should also pay attention to whether or not this information will change frequently, because it will slow down your updates and inserts. Since you wont frequently be adding students, you don't have to worry about the inserts Let's say that you will be looking up the students with a web interface and the end user will be typing in the students name to find them, since r